http://members.rennlist.org/warren/generator.html
Comprehensive web page on connecting a portable generator to the house plus safety and purchase information also.
I cut and pasted info from web site below on 31 March 2016. Newer updated information may be available on the original web site.
Home Generator Installation
Prior to installation of my transfer panel I searched online for information on generator connection and use but found it sadly lacking. This page is intended to provide home owners with guidelines on how to connect and use their generators safely. If you have suggestions, comments, questions, or corrections please contact me. An email link is at the bottom of the page.
Please don't email asking how to safely backfeed your panel. It can't be done. The same goes for asking how to work around safety features, or how to lash together something you dug out of the garage. I won't be a willing participant to unsafe practices and certainly won't knowingly give advice on anything unsafe.
Last changed 21 February 2013.
 Electric generators are potentially lethal if not used properly. There is a very real risk of injuring or killing someone working on power lines with a generator improperly connected to your home. Homeowners should know the correct way to use a backup generator. This page will explain how a generator transfer panel is properly installed. It will alert you to potential dangers and provide some insight on the workings of electricity. You will better understand the reasoning behind the need of a transfer panel instead of a simple double male extension cord. It is not my intent to encourage homeowners to make wiring changes, but rather to provide information which will promote safe and proper generator use. This knowledge can be used while choosing an electrician to do the installation work, and clarify what is being done. You will be able to ask intelligent questions, and maybe even point out wiring errors which must be corrected.
If you are hiring a certified electrician to make sure the work is done properly and just in case your insurance company asks questions, insist on getting a wiring permit and having the work inspected afterwards. Without this paper trail you might as well hire your next door neighbor to do the wiring. Paying an electrician cash under the table to save a few dollars will not provide the protection you think it does.
In many areas, any additions or upgrades to an electrical system is required to have an electrical permit authorized by the local electrical authority. You must be a licenced electrican to obtain a permit to do such upgrades, including any generator transfer panel installation. In the event of a fire directly related to an improper installation, you can be charged and your house insurance may not cover the damage.
In defiance of such rules, people often make electrical changes as they see fit, whether to install a dimmer switch, or to wire their newly renovated basement. In this situation, I encourage people to respect electricity, do the work correctly, and not take short cuts that could jeopardize the safety of themselves or others. A transfer panel installation is more involved than the typical do-it-yourself electrical job. Every installation will have its own set of unique conditions. Use information presented as a basic guideline only.
I do not recommend this project be attempted by the average home owner, and anyone qualified to do such work will likely not need this page at all. Electricity is a useful tool, but it can kill and burn if not used properly.
If you are not fully qualified, knowledgeable, and experienced with the workings of home electrical systems hire someone competent.Click on all links and read thoroughly before proceeding.
Safety first. Never connect a generator by using a double male cord plugged into the dryer or stove outlets. This technique is referred to as
backfeeding and is potentially very dangerous. Do a web search for
generator backfeed and read the responses. Backfeeding creates a possibility of returning power to the grid with potentially lethal results to people trying to repair the power lines. Even though you may know to turn off the main breaker, what will happen if someone else decides to connect the generator and leaves it on? These techniques are along the lines of playing Russian Roulette, except you are gambling with someone else's life. Do it right or don't do it at all.
The safe (and legal) approach is to install a proper transfer panel to provide isolation. The panel will have two breakers through which power feeds. It provides a mechanical lockout system that prevents both breakers from being on at the same time. One breaker is fed from the main panel and normal power, the other connects to the generator. Alternately, extension cords can be used to plug in a freezer or fridge directly to the generator. The furnace can be rewired to use a twistlock wall outlet and connected the same way. Make sure to use cords which are in good condition and with proper current ratings.
It is odd that people will spend several hundred dollars on a new generator but then suddenly go cheap on connecting it to their home. The money saved isn't worth the risk of killing someone, starting a fire, or damaging your generator. When budgeting for the project include extra money for a transfer panel and proper installation.
Always ensure the neutral wire in the generator is connected through the 4 conductor extension cord.
I've compiled a list of improper installations and bad advice. Click to view the
bad installation examples.
Equally important for homeowners is the danger of carbon monoxide poisoning. Ensure adequate ventilation whenever operating a generator. Never operate a generator indoors, in an attached garage, near open windows or air intake ducts for a ventilation system. Carbon monoxide is odorless and its affects may be not noticed until it is too late. Keep the generator away from flammable objects and direct hot exhaust gas away from the house.
Carbon monoxide is an odorless gas which is present in the exhaust fumes of all internal combustion engines. Read more about
Carbon monoxide poisoning.
Quoting from the web site...
You can't see or smell carbon monoxide, but at high levels it can kill a person in minutes. Know the symptoms of carbon monoxide poisoning. At moderate levels, you or your family can get severe headaches, become dizzy, mentally confused, nauseated, or faint. You can even die if these levels persist for a long time. Low levels can cause shortness of breath, mild nausea, and mild headaches, and may have longer term effects on your health. Since many of these symptoms are similar to those of the flu, food poisoning, or other illnesses, you may not think that carbon monoxide poisoning could be the cause. Always supply adequate ventilation when operating a generator. Never operate a generator indoors, near an open window or intake ducts for a air exchanger system. The carbon monoxide fumes could enter the home from outdoors. Your home should have a carbon monoxide detector. A fireplace or furnace can malfunction and fill a home with carbon monoxide as well.
Here is a pamphlet published by First Alert. Questions & Answers about Carbon Monoxide Poisoning,
page 1 and
page 2.
 Return to main
While power outages are not common, there is never a good time to be without electricity. Food preparation is difficult, kids get crazy without TV or video games, it's difficult to receive news reports and updates, and homes that use a well pump will be without water. Forget using your cordless phone or electric can opener. A long outage could cause food in your fridge and freezer to thaw. The basement could flood if you have a sump pump. In winter your house will quickly get cold, possibly freezing water lines. Homeowners should have an emergency kit containing a flashlight, battery-operated radio, food and water, backup heat source, and a backup power system readily available at all times. With a backup generator my family is taken care of, no worries about getting cold or not being able to eat. Total parts cost for the transfer panel is between about $200 and $600, depending on reusing circuit breakers, how generator cord connects, parts on hand, and so on. I consider it a worthwhile investment for such peace of mind. My generator transfer panel supplies power to all essential items and there was even room left to add a few comfort items. Power outages are now optional. While others nearby don't have water to flush a toilet, we can watch satellite TV or even have a hot shower. During construction of our new house my wife was skeptical about spending extra money on something which seemed unnecessary. After several extended power outages, some following major snow storms, she has learned to appreciate the benefit of having backup power and agrees it is something we would never want to be without.
After Hurricane Juan passed through Halifax, Nova Scotia in September 2003, my home was one of very few in the neighborhood with electricity. After power was restored I loaned the generator to a neighbor whose lines had been pulled off the house. Some people were without electricity for three weeks! Other extended outages such as the blackout of August 2003 throughout parts of Ontario and the north east USA, and the Quebec ice storm of 1998 demonstrated our inability to function without electric power. Each year hurricanes wreak havoc with power systems in the southern USA. Winter snow and ice storms, floods, traffic accidents, or even a raccoon climbing where it shouldn't can cause a loss of electrical power. Our dependance upon electricity is seldom realized until the lights go out.
Download advice from the Government of Canada on how to be prepared for emergencies.
Be Prepared, Not Scared (248k .pdf file), Emergency preparedness begins with you.
Plan ahead. We built a new home in the spring of 2002. During construction I made sure the electrical installation was done in a manner that allowed easy installation of the generator transfer panel after we moved in. I spoke with the electrician and helped with pulling wires. I asked that the panel enclosure be made large enough to add the transfer panel to the left of the main panel. I also requested a 200 amp service instead of the standard 125 amp service. This ensures enough extra capacity to supply power to a garage, greenhouse, shed, welding equipment, or whatever else comes along later. Any circuits which were to be supplied backup power connected to the left side of the original panel, and the lines were left extra long, not trimmed to length. All lines are labelled with a black marker to indicate what circuits they feed. After moving in, connecting the transfer panel was relatively straightforward.
Give plenty of time to research electric generators, their use and safety before starting your installation. If you hire someone you will be more knowledgeful and understand what is being done. Allow time to decide what critical items must be powered, calculate load requirements, and
determine proper generator sizing. Do not wait until the last minute during a major storm or outage to begin your research. Generators will quickly disappear during an outage and electrical supply stores will have their supplies quickly diminished.
The system installed at my home is not automated. During an outage the generator must be moved outdoors, cord connected, and the engine started. After running for a few minutes for the engine to stabilize electricity can be turned on at transfer panel. To prevent surge current from tripping the generator circuit breakers I initially turn off all transfer panel breakers. Turn on the well pump, septic pump, furnace, fridge, and freezer in that order, allowing the generator to stabilize before turning on the next device. After that the remaining breakers can be turned on. The generator will easily handle individual surge currents, but not all at once. Don't forget a way to secure the generator against theft. I use a 6 foot cable lock to prevent the generator from being carried away.
When power is restored it is sometimes accompanied by high voltage spikes which could cause damage. To protect equipment in my house I turn off all breakers on the main panel except for the living room lights. It provides an easy indication for when power is restored and will prevent other lights from coming on in the middle of the night. At worst I'll lose a pair of light bulbs. I've repositioned all switches in the house such that when everything points down the lights will be off. There is no more guessing about one switch up and the other down to have the lights off. This should be done regardless of whether you have backup power or not. While you are resetting clocks after an outage, don't forget the timer on the water softener.
It is a good idea to practice generator connection and reveiw safety with anyone who may have to use the system. Know how to check and top up the engine oil and refuel the gas tank. Never refuel while the engine is running or hot. Know how to reset your well pump and check for tripped circuit breakers.
My transfer panel powers 12 circuits. Backup power is supplied for the well pump (240V), septic pump, furnace (heat and domestic hot water), fridge, freezer, bedroom and bathroom lights, kitchen and hall lights, kitchen plugs (2 circuits), microwave oven, and rec room. Not powered are circuits for the stove, dishwasher, bedroom plugs, living room lights and plugs, some basement lights and plugs, outdoor plugs, washer, dryer, air exchanger, and circuits in the garage. I've added an outlet on the furnace circuit to supply power to the home alarm system and keep its batteries charged. It is also a convenient place to plug in an emergency light for working in the garage or outside.
Here are measured currents in my generator panel. I used a Fluke clamp-on AC current probe and Fluke 189 peak reading multimeter to get the numbers. You can see that the run power requirement is relatively minor compared to the start power, especially for the well pump.
| Circuit | Start current | Start power | Run current | Run power |
| Well pump (240VAC) | 27.1A | 6504W | 6.2A | 1488W |
| Furnace | 6.5A | 780W | 2.3A | 276W |
| Freezer | 14.2A | 1704W | 1.5A | 180W |
| Fridge | 21A | 2520W | 2.5A | 300W |
| Septic pump | 18.6A | 2232W | 11.5A | 1380W |
| Microwave | 12.8A | 1536W | 12.8A | 1536W |
| Toaster oven | 12.2A | 1464W | 12.0A | 1440W |
| Rec room | . | . | 5A - 12A | 600W-1440W |
| Kitchen lights | . | . | 2A - 5A | 240W-600W |
| Bedroom lights | . | . | 3A - 7A | 360W-840W |
AC receptacle placement should be done after considering where the generator will be stored and operated. You won't want to have to pull the generator through snow from its storage location to where it will operate. You will not want to climb over snow banks to get access to the power connection for your house. It would not be suitable to have the outlet placed under the eave where water pours or where the ground is frequently wet. Do not operate the generator near flammable materials. The muffler gets very hot and could cause a fire if it is near paper, brush, or trees. Orient the generator so the exhaust gases are not blocked or obstructed. Do not point the muffler towards a door or window. It could melt vinyl siding or damage paint. If you require a long wire from the transfer panel to a suitable location ensure it is of adequate size to handle the power without excessive loss.
When you decide on suitable locations to store and operate the generator, consider digging a large hole to fill with concrete. Set a large eye bolt in the concrete and buy a long cable lock. Always keep the generator secured against theft. Its value increases considerably during an outage, and you won't want to lose your investment.
Proper generator neutral and ground bonding is important. Neutral and ground conductors must be bonded together in one location only. This is done at the main electrical service panel, where both lines connect to a common ground rod or plate.
The neutral conductor carries an equal and opposite current to what flows through the live line. The ground conductor is a safety line only. Under normal use it carries no current and ensures the chassis of equipment (or generator) remains at ground potential and safe to touch. If a frayed live line were to touch the chassis, the ground conductor would carry current safely to ground and open the circuit breaker, shutting off power very quickly.
GFCI -
Ground Fault Circuit Interrupt outlet provides another type of protection, not usually available in a portable generator. It monitors both live and neutral currents, and will open the circuit if the two are not equal. This provides highly sensitive protection for outdoor or wet environments where live current could return via ground, but not have enough current to open the circuit breaker. For instance, this could happen if a person were to come in contact with the live conductor while standing in a puddle of mud. It would likely still hurt, but hopefully be of short enough duration to not cause any major damage or injury.
I've made a GFCI type extension cord which plugs into my generator or other non protected outlet. On the end I've installed a GFCI outlet in an outdoor rated enclosure. Any items plugged into the extension cord are protected.
How Stuff Works also has a page on
How a GFCI outlet works.
I do not recommend the Generac, ColemanPowermate, or GenTran style transfer panels. A GFCI type breaker can not have its circuit relocated through this style of generator panel. The only way to keep proper GFCI protection is to relocate the GFCI breaker to a standard style panel with transfer capabilities such as the Siemens or Federal Pioneer shown below, or to install a GFCI outlet to supply protection downline. The same goes for ArcFault Protection type breakers, but I haven't seen an arc fault protection outlet yet.
Otherwise, a GFCI circuit should operate no differently than any other circuit. The GFCI breaker or GFCI outlet monitors neutral and live conductor current to the protected outlets. Whether the electrical supply is generator or normal street supply this will not change. The source of power does not matter. My bathroom outlets are on the same circuit as the bedroom lights. Not an ideal wiring technique, but I have to live with it. The GFCI outlets work perfectly well while on generator. I've used a GFCI tester and they operate no differently than while on normal power.
Some generators use GFCI breakers to feed the AC outlets. When connected to a panel that does not switch neutral the GFCI breaker will trip immediately. The affected generators have the neutral conductor bonded to ground to pass OSHA job requirements. Home or building electrical panels also have the neutral bonded to ground. This dual bond supplies two paths for return current to flow. The GFCI breaker will detect a difference in neutral vs line current flow and open the circuit.
To remedy this problem, the generator must be changed to supply a floating neutral or the transfer panel rewired to switch neutral. If the generator neutral is changed, the "NEUTRAL BONDED TO FRAME" label must be replaced with a "NEUTRAL FLOATING" or "NEUTRAL NOT BONDED TO FRAME" label. The generator will no longer pass OSHA job requirements.
There are four possible ground / neutral bond and transfer panel configurations.
- Neutral bonded at generator, neutral switched at transfer panel. This is a correct configuration. Neutral for backup circuits will be isolated at the transfer panel and bonded within the generator. There will be no ground conductor current. This requires a three pole transfer switch.
- Neutral floating at generator, neutral not switched at transfer panel. This is a correct configuration. Neutral for the entire system is bonded at the main service panel. There will be no ground conductor current. Only live lines are switched with a two pole transfer switch.
- Neutral bonded at generator, neutral not switched at transfer panel. This seems to be the most common connection technique based on my research. Unfortunately it is not correct. Neutral will be connected to ground at the main panel and at the generator. Neutral current flow will flow along the ground conductor and through the generator chassis. This creates a potential shock hazard as the chassis becomes part of the current carrying circuit. The easiest way to fix the problem is to use a floating neutral generator or make the required changes to the generator internal wiring.
- Neutral floating at generator, neutral switched at transfer panel. The neutral conductor has no ground reference. The neutral should be bonded within the generator or the transfer switch rewired to not switch the neutral conductor.
The generator and transfer panel should be considered as a system, not two independant items. They work together and must be compatible. Most generators I've seen have neutral bonded to the chassis, and most transfer panels do not switch neutral. This combination is not correct and could lead to a potentially dangerous situation. Make sure the person doing your installation checks to ensure compatibility with the neutral bonding issue. If he does not consider this an issue worthy of the effort find another electrician.
The manner in which the generator's neutral and ground wires are connected will determine how the panel must be wired. If the neutral is bonded to ground in the generator, you must switch neutral in the transfer panel in order to avoid a double bonded situation. If the panel is not capable of switching neutral the generator neutral must be isolated, possibly requiring rewiring. Check with someone qualified to determine which way your generator is wired - and if it can be changed.
My preference is to have neutral floating within the generator, and not switch neutral in the electrical panel. I have changed the wiring in my generator for this purpose. It greatly simplifies wiring in the panel, and eliminates the problem of split circuits sharing a common neutral.
A generator with floating neutral presents another potential hazard. It should not be used anywhere except when connected to a transfer panel. If it were used in a stand alone configuration such as at a campsite or with extension cords the neutral / ground bond should be reconnected and a ground rod provided. Some generator suppliers provide a 120V plug with neutral and ground lines connected. For stand alone use, this plug will reestablish the neutral bond at the generator. Many Chinese made generators (sample pics below) supply a 120V/240V selector switch and should not use this jumper plug.
If you decide to make such a plug, remember that neutral is the wide blade on the connector, and will usually use a white or chrome colored screw to tighten the wire.
Click for picture.
Generac supplies a
model 1276 transfer panel for use with their generators. I was very disappointed after looking through the installation instructions to learn it is not capable of switching neutral. The majority of their generators have neutral bonded to the frame. As such the two should not be used together. Use of the panel will get your lights and other appliances working again, but safety will be jeopardized. Separately each item is perfectly safe, but should not be used in combination without changes to the generator. If you plan to use the 1276 transfer panel, ensure your generator has neutral floating. If using a Generac generator, you may have to make some minor changes inside the generator output panel to make the system work properly and safely. I have
wiring instructions for the Generac 4000EXL, 5500XL, 7550EXL, Wheelhouse 5500 here.
Coleman-Powermate supplies a similar type transfer panel which does not switch neutral either. Their generators I've seen for sale lately have been labeled with floating neutral, making them safe to use with the panel. Do not use these generators in a stand alone configuration without reconnecting the neutral / ground bond however.
There are several other similar panels which do not switch neutral. Typically they have a three position switch and a push button circuit breaker for each circuit, and a flexible metal cable with numbered red and black wires. A quick check online found several brands including EmerGen Switch models 6-5000 and 10-7500, GEN-TRAN, PRO-TRAN and others. Other panels may have two interlocking circuit breakers to select either generator or main power. If there are three sections being switched the panel is likely capable of switching neutral (see closeup of my Siemens transfer panel picture below). Otherwise the generator should have neutral floating from ground.

To determine if your generator uses a floating or bonded neutral perform this simple test. With the engine off, use an ohm meter between the chassis and neutral conductors in the outlet. If it indicates open circuit, the neutral is floating. A short circuit will indicate neutral bonded to ground. I don't recommend doing this to household circuits due to the possibility of exposed AC and damage to the meter.
Plug in an electrical tester as shown and start the engine. If it indicatess open neutral, live/neutral reversed, or live/ground reversed do not use the generator and have someone qualified check the wiring and make the necessary repairs. Use the tester throughout your house to ensure it is wired correctly. This sort of tester is often inaccurate for determining whether the neutral is bonded or not. Even with a floating neutral, the second light will often be on. I suspect this is due to very low leakage currents and a high impedance bulb in the tester.
The generator should be grounded properly. A house should have a single ground point. Once the generator is plugged in through the twistlock plug, its chassis is connected to the house ground. Driving another ground rod to connect the generator is incorrect when it is supplying backup power via a transfer panel. If you are using extension cords with the appliances being powered entirely isolated or away from other sources of power such as while camping a ground rod should be used.
Schneider Electric has an Application Note on
Standby Generator Panels which has very good information about neutral bonding. It should clear up any misunderstanding about the importance and reasoning behind the issue of the neutral and ground connection. Nova Scotia Power has a bulletin detailing inspection requirements, and information regarding
neutral bonding. Please read both.
Can you splice wires inside a load center and not violate building codes?Section 312.8 of the National Electrical Code permits splices and taps in enclosures if the splice or tap does not fill the wiring space to more than 75% of the cross-sectional area of the space. Unless you already have a large number of splices or taps in the load center, adding some more to install the transfer switch is not going to exceed the limits of the Code.
My former generator, a DeVilbiss GT5000 originally used a 3 wire 240VAC output which was not suitable for connection to a transfer panel. I added a L14-30R 4-conductor twistlock outlet and isolated the neutral and ground lines. I've also changed my Generac 5500XL and a friend's Wheelhouse 5500 to have floating neutral.
Details are here. There are instructions for floating neutral for other generators.
Energy conservation is especially important while on backup power. It sometimes becomes a juggling act to decide what can be turned on and what must be turned off. The toaster oven and microwave are fed from opposite lines on the generator, but when operating there is little extra capacity for other things. Your generator may not have enough capacity to operate the well pump to take a shower while meals are being prepared. To further cut back on electricity consumption, I've added dimmer controls and fluorescent bulbs throughout the house. For homes which do not use a well pump and septic pump 5kW should be plenty of power. For my home, the 5500W generator is adequate, but little to spare.
Keeping the Heat In (3.3Mb pdf), Produced by Natural Resources Canada's Office of Energy Efficiency. (View from
Natural Resources Canada page)
Are you looking for ways to reduce energy use around your home and on the road? Natural Resources Canada has produced a list of 350 energy and money saving tips entitled
Energy and Money- Saving Tips (71 pages, 911kB .pdf)
From Nova Scotia Power -
Top 10 hot tips to stay warm & reduce energy costs
Although portable generators must be used outdoors, they are not weather proof, nor designed to run in freezing temperatures. Rain or snow may cause problems with the electrical system, start rust, and shorten its life. Cold air could cause the carburetor to freeze and stall the engine. I plan to build a shelter to place over the generator. It will allow a flow of air for cooling, provide shelter from rain, and hold some engine heat to prevent freezing. To get an idea of what to build, there is a picture on page 8 of the
owner's manual (.pdf) for the Generac 5500XL.

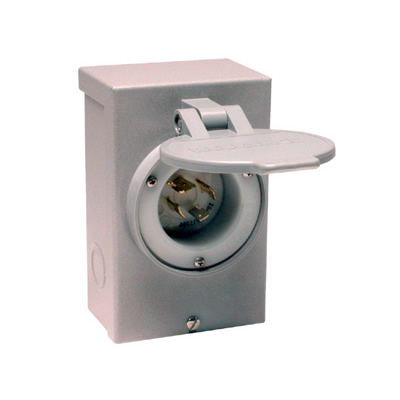
Not all weatherproof inlets are entirely weatherproof. The type of inlet shown in the picture is only weatherproof when the cover is closed. Once you plug a cord in the cover must remain open. The electrical connections are no longer protected against the elements. Many homes have outdoor GFCI protected duplex outlets with similar covers.

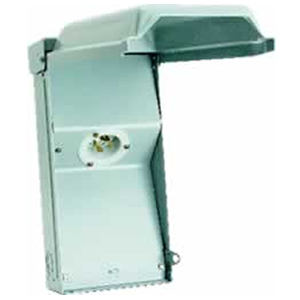
This type inlet has a cover which will protect the electrical connections even with a cord attached. This is clearly the preferred approach if you must install an outdoors inlet. My preferred method if possible is to install the generator inlet indoors and feed the main cord under a garage door or through a window. You could even install a small trap door or dryer vent arrangement to bring the cord inside.
Routine maintenance
Owning a generator could be disappointing if it didn't work when needed. To avoid getting stuck with no electricity, test the generator at least once every two months. This will identify any problems and allow repairs before an outage. Always use a fuel stabilizer in the gasoline so it does not turn stale and foul the carburetor. Prolonged periods without use will sometimes cause the magnetic field in the generator to weaken. Attach a small load to the output to maintain the field while testing.
In my limited experience with small engines, perhaps the most important single item I've learned is the need of cleanliness. Clean oil, clean air, and clean fuel will help ensure a long and reliable life. Dirt in the carburetor can cause flooding making the engine very difficult to start. I've had the carburetor leak badly after the needle valve was kept open by a tiny piece of rust which came from the fuel tank. Dirt which is allowed to enter through the carburetor can cause major engine damage, scoring the piston and rings, and result in loss of power, burning oil, and reduced performance. Place an inline fuel filter between the fuel switch and the carburetor for added protection. A blocked air filter will not allow a proper supply of air. Like the engine in your car, the generator engine needs routine oil and filter changes. Check the oil level and add oil as needed before starting the engine. Check the engine manual for recommended change intervals, likely every 25 or 50 hours of operation or at least once per year. A new engine will require an oil change after about 5 hours running time. Oil will begin to get acidic after heated to operating temperature and will accumulate carbon and dirt from air and combustion. Leaving old oil in the engine merely because it's been used only for a few hours is a poor decision. If you purchase a used generator change the oil right away. There is no way to tell how long it's been sitting in the engine.
Consider your investment in the generator and the desire for maximum engine life and reliability. For an extra $5 per year purchase synthetic oil instead of conventional oil. The amount of money being spent on fuel will eclipse the small amount extra to be spent on synthetic oil. I use automotive 5W30 oil in my generator and snowblower.
Oil change time is a good opportunity to check and change the fuel and air filters. Paper type oil or fuel filters should be replaced at least yearly. If there is no fuel switch or fuel filter one of each should be installed. Electronic cleaning spray works very well for degreasing parts and leaves no residue behind. I use it for cleaning carburetors and making sure all mating surfaces are clean.
Three things are needed to make the engine work.
1. Fuel. Check the fuel switch, fuel filter, and carburetor. If you've left gasoline in the tank for a long time it may have gummed up the filter and carburetor. The carburetor will have to be dismantled and cleaned out and the filter replaced. Drain the tank and use fresh gasoline. Always use Stabyl with the fuel to prolong fuel life and reduce effects of stale gas.
2. Heat comes from the spark plug. Make sure it is clean and in good shape. Replace if necessary. Remove from the engine and plug into the line. Lay it on top of the engine and pull the starter cord. There should be spark visible. Unless you've opened the engine casing or removed the flywheel, the timing should be ok. If no spark you may need to replace the ignition module or points and condenser.
3. Oxygen. Check the air filter and replace if it appears dirty.
If you've just purchased a used generator take some time to do maintenance right away. Check the engine speed to confirm the output voltage is 60Hz. There is usually a small nut to adjust spring tension near the speed governor. Let the engine run for about 10 minutes to warm up and adjust the nut for 3600rpm. Very few people will ever change the engine oil. After checking the engine speed is a perfect time for this. Remove the plug and let the oil drain. Tip the entire thing at an angle to get as much out as possible. Make sure there's a fuel filter prior to the carburetor. It's the only protection against getting dirt into the carburetor. Many small engines don't have one. Always use fuel stabilyzer and small engine tuneup fluid mixed into the gasoline. A new spark plug and full cleaning as the final touch and it's done. And finally, once you're done running the engine, turn off the fuel valve and run it dry before storage. This will prevent the carburetor from getting fouled up with stale gas.
The engine oil should be checked every time prior to starting the engine. It should be changed after 25 to 50 hours running time or every 12 months, whichever comes first. Once heated to operating temperature, oil starts to deteriorate and becomes slightly acidic. Run the engine for a few minutes to get the oil heated and flowing better. Tip the engine at about a 30 degree angle and leave for about 30 minutes to make sure everything is out. Don't go cheap on the oil. Any reputable brand name 5W30 will be fine. Avoid cheap store brand oil.
Oil change time is also a good time to replace the spark plug. It's good preventive maintenance. Stick with the exact replacement from the original engine manufacturer to ensure optimum performance. Don't use the replacement brands in the lawn mower aisle at the hardware store.
Run the engine for about 30 minutes every month or so. This will prevent fuel from forming gum and varnish in the carburetor. Remember to run the carburetor dry when shutting down. Always mix stabilyzer with the gasoline. This will help keep the carburetor clean and extend the life of the fuel.
When the engine is running for testing, plug something into the generator to act as a load. A small electric heater, a few light bulbs, anything at all to make things work a little. Over time the residual magnetism in the electrical side can weaken and fail. Having a load will ensure the field remains strong.
An added bonus to routine testing is that it may detect a failure or trouble in an early stage. It's better to fix something before it is needed. You don't want to discover the engine won't start or other problems when the power is out. Just don't bury your generator in the garage and forget about it until it's too late.
Please don't operate the engine indoors, and don't back feed the house through your dryer or stove outlets! You're better off cold and hungry than you are dead. Do things properly and safely or don't even start.
Field Flashing of Portable Generators
If the engine is working well but there is no output voltage try this ridiculously simple trick.
Start the engine and plug in an electric drill. With no output, the drill will not turn with the trigger pulled. Pull the trigger and give the chuck a quick spin by hand. If it doesn't take off by itself spin it the other way.
Use caution not to get your hand or other materials caught in the chuck. As soon as the field is excited, the generator will produce power and the drill will turn on.
The reason this works is because the electric motor in the drill will act as a small generator when spun. The magnets in the drill's motor induce a voltage that is fed back into the generator's stator winding. The voltage creates a magnetic field that the rotor intersects. This will induce a voltage and current in the rotor winding. Once current flow is present in the rotor winding the rotor has been flashed and the generator will come back to life.
If flashing the field does not make the generator work, you may have additional problems besides a lack of magnetism in the rotor. Further testing will be needed. Hopefully, this will give a simple way to field flash your generator if needed.
If this technique fails, there is another method which may succeed. It requires the use of a double male cord with light bulbs in series. Due to exposed AC and its associated hazards I would use this only as a last resort. It is also why I am only
linking to the site.
For Generac owners finding the exact Generac replacement filter can sometimes be difficult and the filters are rather expensive. A regular automotive oil filter can be installed for about half the price. My 5500XL came with a Hastings LF410. According to Purolator its equivalent is a L14476. Other substitutes for Generac part number 70185 oil filters include NAPA Gold 1394 or 21394, Pennzoil PZ39, Fram PH4967, WIX 51394, Amsoil EAO09, Mopar FE308. It is the same filter as used on a Toyota Corolla or Echo. Visit
Purolator's web site. Click on Vehicle Applications, then Click on Where Used Guide. Under part number, enter L14476 and click Continue. You will be given a long list of vehicles which use the same filter as the standard Generac filter. Go to wherever oil filters are sold and ask for one for that type vehicle. The Purolator L14477 is the same size but about 1/2 inch taller. For other oversize filters you will have to match on your own. Often there are several filters which have the same diameter, mounting threads, and so on. The only difference is the length of the filter. Having a larger internal filter will provide extra surface area, slightly reduce back pressure through the filter, and the ability to remove more dirt before the bypass valve opens.
I try to avoid Fram oil filters, and never use any type of oil additive or filters with added teflon. Note that Quaker State and filters sold under the Canadian Tire brand appear to be relabelled Fram filters. Read these engine oil filter studies and decide for yourself.
Engine Oil Filter Study. When you change oil on your generator, don't forget to start the engine to ensure oil flows through and fills the filter. Recheck and top up the level.
The Generac tune up kit for 11, 13, and 15HP engines includes a new Champion RC12YC spark plug.
RC12YC Champion spark plug replaces Autolite 3924, NGK BCPR6ES, Briggs 491055s, Kohler 12-132-02.
I've tried the supposed high performance E3 First Fire spark plugs supplied at automotive stores in my snowblower. The results were less than stellar and I've gone back to the original Champion. Now it works like it should. Save your money.
Here are two links which may assist with troubleshooting and repair of your small engine.
Repairing small engines and
Small engine advisorGenerac Service and Repair Manual for
Large Frame GN engines.
Briggs and Stratton Model and code information.
Depending on the amount of expected use, type of engine should be considered. Overhead valve engines will run quieter and last longer than side valve engines.
Here is some information, originally from Generac, which explains some of the differences. While adequate for occasional emergency use, most inexpensive generators use side valve engines.
Some common
generator and electrical definitions.
Other
Generac information is available here.
I purchased my transfer panel at Home Depot. There are two versions available, one rated at 30A and the other 60A. Under regular power, 30A is inadequate for the full load in the panel. The price difference in the two panels is only $10, so I chose the 60A model. Depending on the original electrical panel in your house, circuit breakers may be reused. Total cost for my panel with all new breakers was about $350. The power cord, twistlock connectors, and other items came to another $150. An outdoor weatherproof connector will cost about $80 and you will have to add the cost of wire to go to the transfer panel. With proper shopping or using parts on hand, this cost should be less than $600.
Here is a brief list of things I check whenever opening an electrical panel.
Inside electrical panel, check and tighten all wires. Check and tighten all fuses if used.
Look for discolored wires which may indicate loose connections or overloaded circuits.
Inspect BX cable for damaged jacket due to too tight a turning radius.
Look for improper wiring on breakers, ie more than one wire per breaker (as appropriate).
Check for properly bonded neutral in main panel, jumper removed in sub panels.
Check ratings on breakers to ensure adequate for wire size feeding circuits.
Discuss with home owner about any unusual problems, switches or outlets not working properly, lights dimming, etc.
Portable generators are noisy. If you have neighbors nearby or the noise is unbearable in your house here are some ideas.
Choose an operating location as far away as possible. Note that a larger gauge wire is needed to reduce voltage drop as line length increases. Reducing line loss is required to minimize power loss and to ensure maximum power is available to the house. Lights will flicker less when heavy loads are attached.
Change the exhaust system. Noise from the portable generator systems comes primarily from two sources, the engine block and the exhaust system. With an air cooled engine there is little you can do about block noise. Some engines can have a larger muffler attached or make other changes to the exhaust system. Merely mounting exhaust pipe vertically will noticeably reduce noise.
Build a noise shielding enclosure. This could be as simple as a piece of plywood to reflect sound away from the house to a separate shed to hold the generator. Design your enclosure with safety in mind. Provide adequate air circulation and ventilation to prevent heat buildup and to remove carbon monoxide.
If the noise bothers your neighbors, invite them over for coffee or offer to run line to their home to power the freezer or a few lights. Talk to them before starting the engine, ask they let you know if the noise is bothersome before they phone the police or harbor any resentment. A little diplomacy can go a long way.
Last resort, shut off the engine or buy a quiet generator.


 Here is a generator which has had a larger muffler mounted.
Something similar may work with other models.
Click thumbnails to enlarge.
Alpha Disaster Contingincies has an article called Quieten That Generator.
Briggs and Stratton does not recommend replacing their factory muffler in an attempt to reduce noise. Act accordingly. From their FAQ:
Question
Are larger (quieter) mufflers available for my generator?
Answer
At this time we have no approved after market mufflers for any of our units. Also, we do not produce a silencer or muffler to replace the current muffler on any of our units.
Note: A muffler that has not been tested could actually increase the exhaust temperature causing engine damage, possibly voiding the warranty. Please check with the engine manufacturer.
Here is information on NEMA plugs and nomenclature including popular generator twistlock outlets.
A more detailed version is available as a Microsoft Word document.
Powermate Generator selection guide.
Backup Generators: Consumer Reports.
The magazine also published an article on generator selection in November 2003. While outdated, it has useful information.Email me for a copy.
American Red Cross has a short document titled Fact Sheet: Using a Generator when Disaster Strikes.
I've put together a comments and FAQ page based upon email which has been received.
Here are extra articles regarding generator safety.
Allegheny Power Generator Safety for the Home
US Consumer Product Safety Commission Alert: Portable Generator Hazards
San Diego Gas & Electric Facts You Should Know About Portable Electric Generators
New York State Electrci & Gas Emergency Generator Safety - Key Points of Generator Safety
Here are pictures of my various generators. Click thumbnails to enlarge.
 My first generator was a DeVilbiss GT5000. 5000W rated, 6250W surge.
Side valve engine with tiny muffler was very noisy. It was difficult to move without wheels. So far this is the only generator that has powered the house for an extended period. One outage was about 16 hours and following Hurricane Juan power was off for about three days. It then moved to a neighbors house for almost two weeks.
 Next was a Generac 5500XL. 5500W rated, 6875W surge.
Nice generator but I was disappointed in its performance. It had difficulty with starting the well pump. The engine would surge repeatedly until the pump was running.
 I had use a Briggs & Stratton 030206 Elite series generator for about a year. 5500W rated, 8500W starting capacity.
It started the well pump with ease. The engine had less than three hours operating time when I sold it.
Here are the Electrical diagrams (pdf) and Engine manual (pdf).
 A Generac 7000EXL is my present backup generator. I found it with very low running hours and in almost new condition. It even has electric start! The engine ran perfectly but unfortunately there was no output voltage. Two components on the power regulator board were replaced and it came back to life. The internal circuit boards can be expensive to replace. It can be a great money saver to repair them instead. I've put together a page with pictures and schematic diagram of the Generac 84132 output regulator board. I've also exchanged the 120V 30A outlet with a 120/240V 20A twistlock outlet and changed the neutral to be floating. This will make the generator more versatile and better suited for most transfer panel connections. This generator easily powers the transfer panel. I've turned on all the lights, toaster oven, microwave oven, and then opened the water taps. Other than briefly dimming when the well pump turned on the lights remained at full normal brightness.
Here is the Generac Engine manual (pdf).
 I also bought a small Coleman Powermate 1850 Pulse generator to repair. The output voltage was not steady when purchased, caused by a broken speed governor lever inside the engine. A few pieces later and it was working well. Click the picture to see the repair. It's a nice little machine and worked well despite some nasty online reviews. It uses a 3.5HP Briggs&Stratton engine and provides a standard 120VAC duplex type outlet. Pull cord replacement can be a major undertaking as the fuel tank must be removed, followed by fully dismantling the housing to gain access to the side of the engine. It isn't as quiet as some of the Honda units, but neither is it nearly as expensive. I think it is too noisy for use at a campground.
 I'm presently working on a Coleman Powermate 6250 generator. The output voltage and frequency were not steady. The carburetor was loose causing a bad intake air leak. The engine was out of control, preventing the speed governor from working. There is another problem in the AVR board as well. One thing at a time.

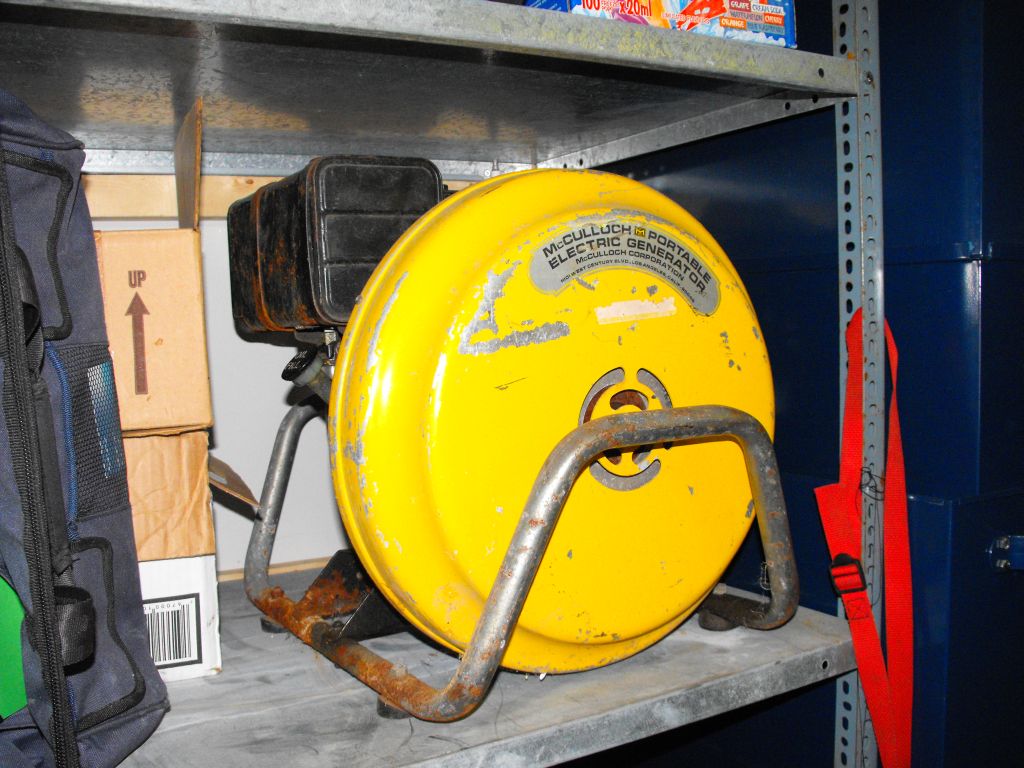
 My next project may be an old McCulloch H3000 generator. 120/240VAC, 3000 watts continuous, 129 pounds.
It is powered by a Briggs and Stratton engine. Model 170432, type 1070-02, code 75011611.
Model 170432 indicates 17 cubic inch displacement, horizontal shaft, ball bearing flange mounting splash lube, rewind starter.
Code 75011611 indicates date of manufacture 1975 January 11.
This generator was destined for the garbage bin before being diverted to the trunk of my car.
The engine is running, but the output voltage is not correct.
Here are pictures of my transfer panel.
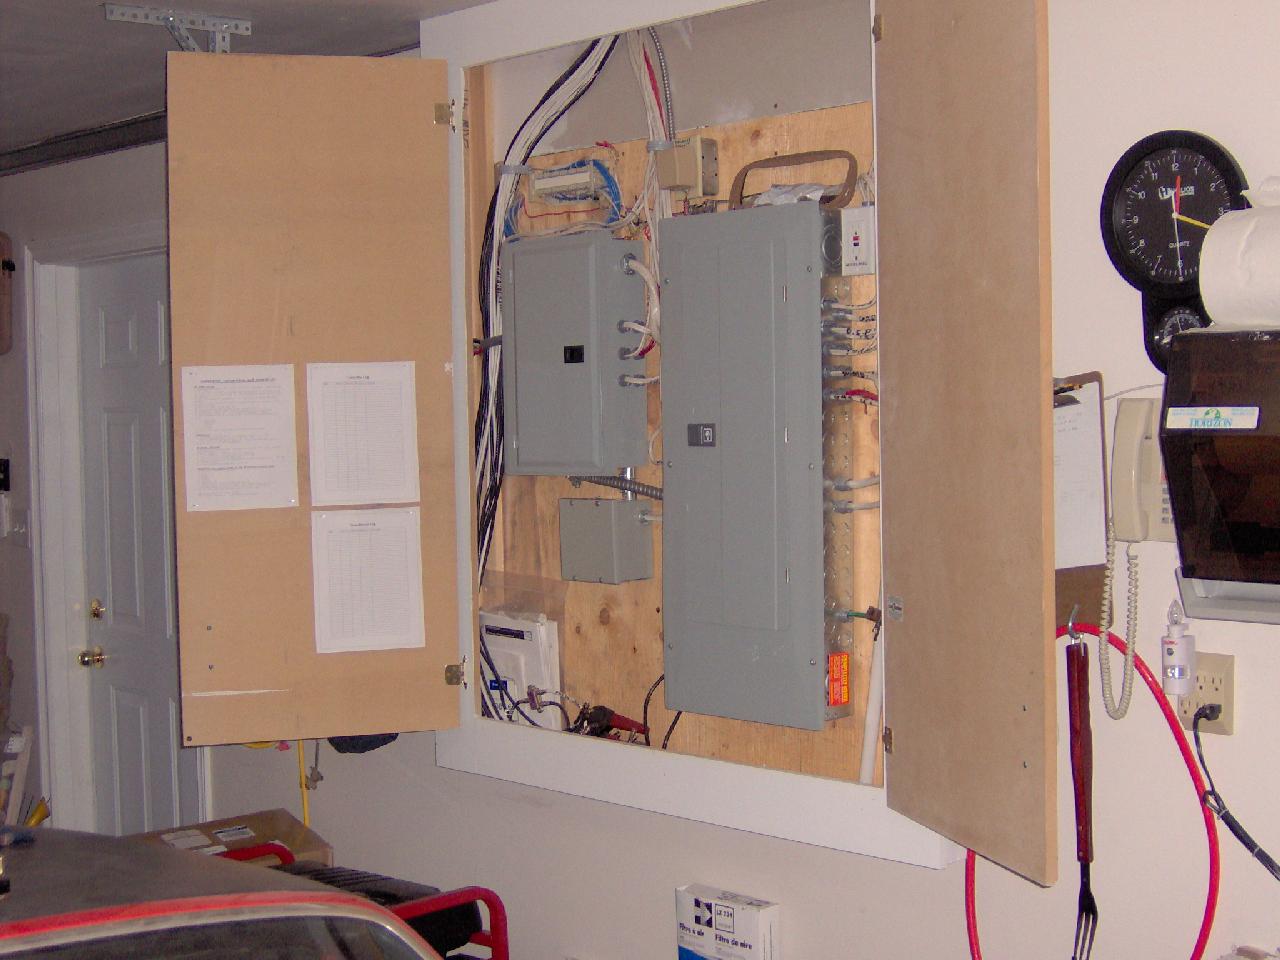
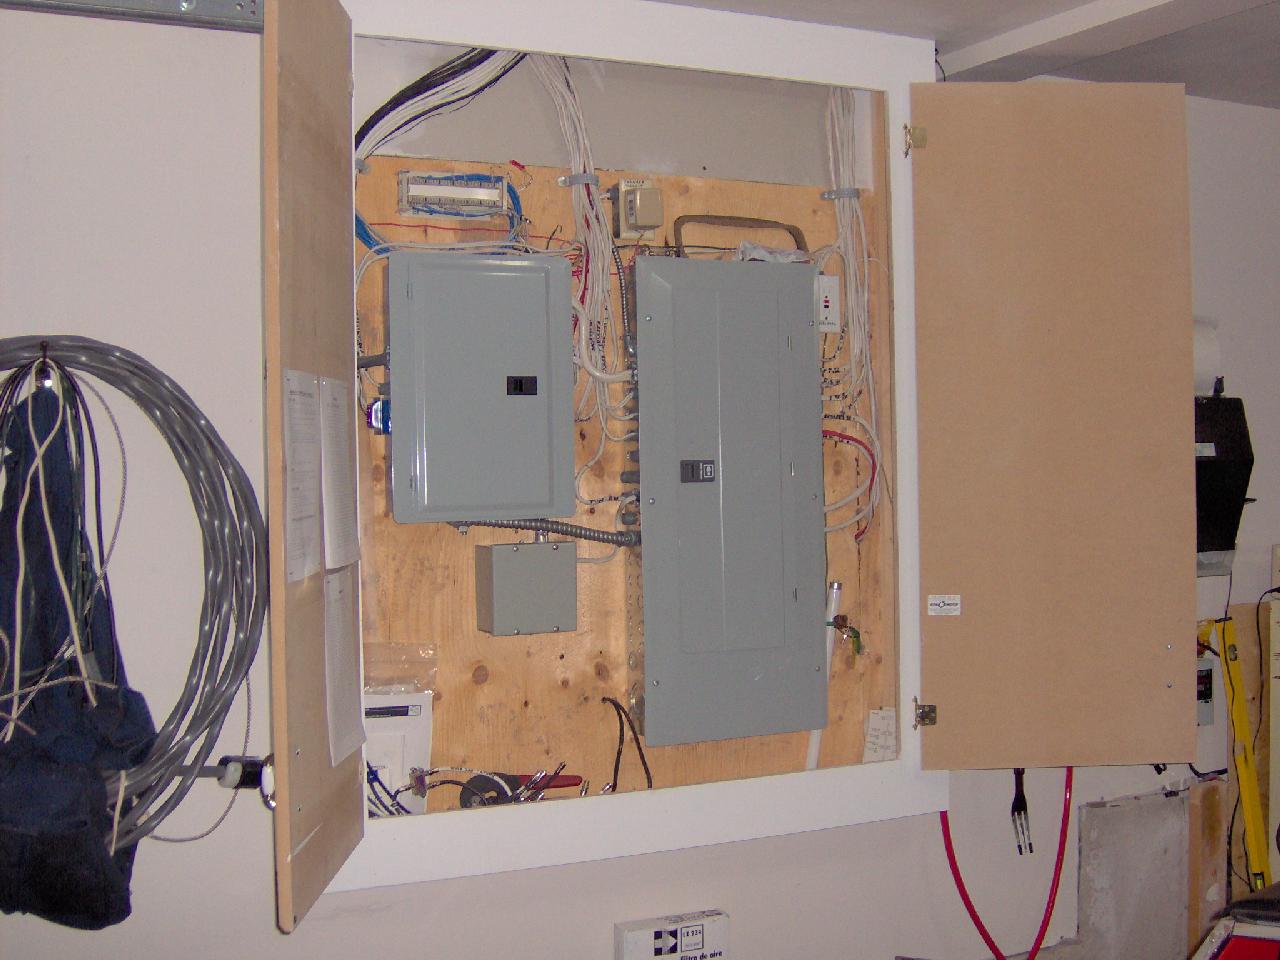
 To the right is the main 200A panel, left is the 60A generator transfer panel. Above the generator panel are phone lines, to the left are lines for satellite TV. Instructions for connecting generator, contact and account information for Nova Scotia Power are on the paper on the left door. I have added sheets to record operating time for the generator and snowblower. This will assist with regular oil changes and other maintenance.
The small box below the transfer panel is part of my wind generator project. It is another transfer switch which automatically selects battery power or normal power for certain house circuits.
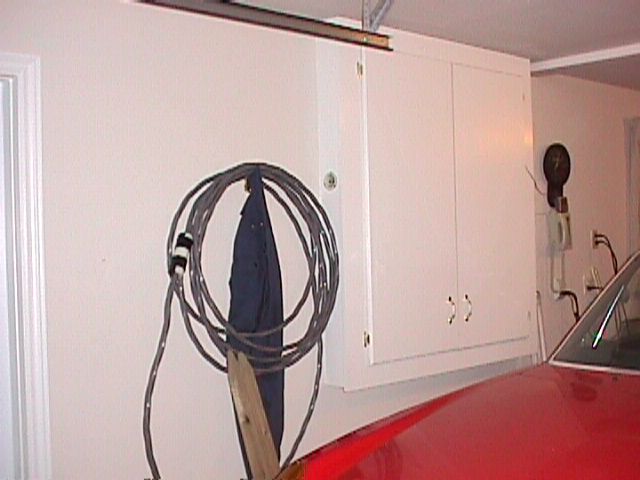
 Similar picture from a different angle. Large white wire between panels is 6/3 which carries power to the transfer panel.
 Closeup of the 60A Seimens transfer panel. Two large breakers at top are interlocked such that only one can be turned on at a time. This is the main safety feature of a generator transfer panel. It prevents generator power from backfeeding to the main panel and on to the street.
The biggest problem I have with this panel is how the circuits are split 8 on one live line and 4 on the other when using all 12 available spaces. This makes it difficult to balance generator load. Ideally there would be an equal split, 6 circuits per live line. An internal picture of the panel shows how the bus is configured.
 Extension cord 6/3 wire with 30A twistlock plugs. Visible on left side of panel enclosure is 30A twistlock plug for generator to connect to system.
Here is an installation I'm working on. I'll have a step by step procedure including pictures once completed. It will be configured as a two pole transfer switch with neutral not switched. The generator neutral is floating. The panel has been prewired so the visit for installation will be greatly simplified.


 Pictures of transfer panel with older fuse panel. Cole Harbour, NS. 7 September 2005
Left picture shows inside of Siemens transfer panel showing premade Generac harness. Wiring is complete and front cover is ready to install. Neutral is not switched in this installation. Generator power enters from left side of panel, main power enters from right.
Right picture is completed installation. Original panel uses fuses. The only circuits not on generator backup are the electric stove and the clothes dryer.
Pictures of Dave King's Siemens 60A transfer panel. Powassan, Ontario.
 Pictures of Federal Pioneer 60A Stab-lok transfer panel at Gite Montagne Nirvana B&B , St Faustin-Lac Carré, Quebec.
The panel is available at Home Depot, part number 047569324833, price $204.50.


I think it prudent to warn people about cheap knockoffs coming from China. They appear to be cloning engines used by Honda, Briggs & Stratton and other reputable manufacturers. While the prices seem attractive, especially when you factor in electric start and wheel kit included, you should be very wary about purchasing this equipment. One person emailed me asking about changing the outlet to a 4 conductor twistlock from the 3 conductor originally supplied. After going inside, he found the quality of the connectors very low. The wiring was confusing and difficult to change without fully rewiring the electrical panel. He also learned that the generator was not CSA or UL approved. This generator was purchased via eBay. I've found electrical issues which should be addressed. I don't like these generators and have not seen a single redeeming feature with any of them.
Problems which should be addressed immediately are related to circuit breakers. In one model with a 120/240V twistlock outlet, only one breaker is supplied for 240VAC. It is installed one live line, leaving the other live line without any form of protection. This may not be as much a problem for a device operating at 240V only, but could be a serious safety issue while operating something at 120V from the 4 conductor twistlock outlet. A proper breaker must be installed in the second line to protect the generator from overload. While operating at 120V only, the breaker rating is too high to protect the outlet. The outlet must be changed for a higher current rating, or the breaker current rating lowered. The 120/240V output switch does not properly disable the unused outlet. Devices plugged in may suffer damage. One of the neutral lines becomes live when the switch is changed.
Surprisingly, even in a generator which is claimed to be CSA approved (sold as King Canada model KCG-3000G) there are several problems which also got past electrical inspectors. The distributor claims it uses a bonded neutral, but it appears neutral is actually floating. While operating at 120VAC, the coils are in parallel and the breakers wired in the neutral conductors, not the live conductors. On the 4 conductor outlet, the Y connection is still connected to the live line. X and neutral are disconnected. While operating at 240VAC, the coils are in series, with the center connection forming the neutral conductor. The breaker for one generator output coil is in the neutral conductor, not the live conductor. The live conductor on the 120VAC outlet is still powered from one output coil, but the neutral is disconnected.
My suggestion to one owner was to remove the dual voltage switch entirely. Rewire the breakers in the live lines feeding the 4 conductor twistlock outlet. Split the 120V duplex outlet and feed from the neutral and live lines from the twistlock outlet. Neutral can be left floating or bonded to ground as required. His decision was to return the generator for a refund. Wise move...
Due to the manner in which the 120V/240V selector is wired in these generators, I would recommend against using a jumper plug to supply a neutral to ground bonding connection.
Another owner pointed out that some of these generators use twistlock outlets which are under rated. A 20A L14-20 type outlet should be ok for up to a 5000 watt generator. Make sure the outlet is protected by 20A breakers. Anything larger (up to 7200 watts) should use a 30A L14-30 type outlet, and have 30A breakers inline.
Someone emailed me about lights being excessively bright in his refrigerator while operating on his new Chinese made generator. He measured about 170 volts at the outlet and only about 70 on another. This pointed directly to a neutral wiring problem in the system. Upon inspection of the L14-30 outlet within the generator it was found that the neutral wire was missing entirely. He placed a jumper from the 120V duplex outlet neutral connector to the L14-30 and the problem was solved. Before powering your house from the generator ensure this wire is in place! Start the engine and measure voltage from the neutral terminal to each of the line terminals. It should measure about 120V on each live line.
I'm trying to get information on other models in their lineup.
Check file number 223771 at CSA International web site. Here is the CSA Class Description, and Certification Record.
The generators are made by Fuzhou Launtop in China. There are many hits for the company from a Yahoo web search.
I have no long term reliability or quality knowledge about the engine. You may save a few dollars up front, but be prepared to receive a questionable quality product with little after sale support as a result. If you are spending money to ensure reliable long term backup power you may wish to reconsider your purchase and keep looking. I'm admittedly biased against anything which says MADE IN CHINA. I view it as a label warning of low quality, poor reliability, and lack of any real value. Like anything else, you get what you pay for. If you want a cheap generator and lowest price is the only criteria, China may have a deal for you after all. Many models of Chinese generators can be found at dealers throughout the USA, Canada, and eBay. Do your research to ensure you get what you expect.
 Princess Auto is recalling generators sold in November and December 2005. These are yet another version of the Chinese made generators.
Here is the information for the 6500W units and the information for the 2400W units.
A CSR from Princess Auto said owners could get the work done on their own and submit the repair bill to Princess Auto to be reimbursed.
You may want to phone first to make arrangements.
It appears both generators use a floating neutral, thus masking the problem until the generator is actually connected to a load. The line and neutral wires have been reversed on the 120VAC outlet. On the 6500W generator one of the live lines connects to chassis ground and must be isolated.
As is typical in many portable generators, there is no standard color code used. White is used as a live line and blue is neutral.
Anyone in the Halifax area with one of these? I'd like to take a closer look at the insides. The pictures supplied by Princess Auto still don't look quite right, especially for the 6500W generator. Without tracing things through there's no way to tell what else may need to be corrected. I'd like to draw a wiring diagram, take a few pictures, and ensure the generator is properly wired and safe to use.
A quick and easy check is to use a 3-light tester to plug into one of the 120VAC outlets. If it indicates reversed neutral and live lines you should not use the generator until corrections have been made. This is a good test for any generator.
Princess Auto is selling a generator which uses a Honda engine, but has a label stating MADE IN CANADA. I'm not aware of Honda manufacturing small engines in Canada. Again, further research is warranted before purchase.
From Princess Auto web site.
PRINCESS AUTO IS VOLUNTARILY RECALLING 2400 Watt and 6500 Watt Generators purchased in the months of November and December 2005
THE GENERATORS INVOLVED ARE UNDER THE FOLLOWING NUMBERS:
8088817 2400watt Model DF2500H
8088825 2400watt Model DFY2500H
8088833 6500watt Model DF6500H
8088841 6500watt Model DFY6500H
These units will need to be taken to your nearest PRINCESS AUTO location IMMEDIATELY.
These units require minor re-wiring.
A certified electrician will inspect and re-wire.
A full refund will be honored to you the customer if you desire.
Princess Auto apologizes for any inconvenience this may cause.
To locate the Princess Auto store nearest you, or for more information, call Princess Auto Ltd. toll free at (800) 665-8685 between 7 a.m. and 6:30 p.m. CT Monday through Friday, Saturday 8 a.m. to 4 p.m. or go to Princess Auto Ltd.'s web site at www.princessauto.com.
Note that Princess Auto has made changes within the Power Fist lineup and no longer carries these models. They now offer similar models that do not require any changes to wiring. For anyone purchasing a used generator, this recall warning could still apply. Please check your model number prior to contacting the store.
Here is a mini directory of my generator related pages. Lots of links throughout.
Transfer panel installation pictures.
Generator neutral bonding modifications.
Portable generator FAQ.
Improper generator installation.
Consumers Reports, Nov 2003; Generator review.
Power failure preparation.
Generac Engine information.
Generac 7000EXL pictures and repair.
Briggs & Stratton 5500W generator.
Generac 5500XL generator.
DeVilbiss GT5000 generator.
Portable generator selection guide.
Generator glossary of terms.
Useful links
Nova Scotia Power outage information.
Nova Scotia Power has safety information for use of generator, and a bulletin detailing inspection requirements, and information regarding neutral bonding.
Ontario Electrical Safety Code - Info Sheet Portable generator connection example.
Ever wonder about electrical power consumption within your home? I use a Kill A Watt power monitor which will display everything from current requirements to kilowatt hour consumption for whatever is plugged into it. It is useful to monitor generator frequency and voltage output. It will not work with a modified sine wave inverter. Cost was about $40 Canadian.
Here is more information.
Kill A Watt Electric Usage Monitor
Inside the Kill A Watt
GenerLink is a five-inch device that is installed behind your electric meter by your local utility. When you connect a portable generator and start it up, GenerLink automatically disconnects your house from the electric utility grid preventing the possibility of back feed which can damage equipment and harm utility personnel.
This device switches both live lines, leaving the neutral/ground conductor in place. This will require a generator with a floating neutral conductor, not bonded to ground. As GenerLink powers the entire house you must be careful not to overload the generator. There will be no indication within the house for when power is restored. It uses a type L14-30R input connector, maximum power capacity is 7200 watts. The price tag is relatively high. Depending on your application it may be more economical to install a secondary transfer panel to power selected circuits only. Further research and pricing for your particular installation is recommended. Check with your local power utility for approval of GenerLink before purchasing.
Federal Pioneer (also Federal Pacific) manufactures transfer panels.
For new construction or full panel replacement, consider a Service Entrance Transfer Panel.
As an addition to an existing system, an auxiliary transfer panel may be more suitable. This model is available at Home Depot.
Before purchasing one of these panels please read the following warning.
Further research is warranted, as the manufacturer may have resolved the potential problems.
FPE Panels - Hazard or Hype? (.pdf)
Schneider Electric also sells a Generator interlock kit. If you have a Square D type panel, this could provide an inexpensive safety interlock and turn your existing main electrical panel into a full home transfer panel. Note that this will switch both live lines only and leave neutral bonded in the panel. As such, the generator neutral should be floating and not bonded to its chassis. The problem I have with this technique is the safety interlock is defeated if the panel cover is removed.
Square D Generator interlock kit, and Manual transfer equipment kits.
Same problem, remove the panel cover, and the safety interlock goes with it. Easy to defeat the safety feature.
Generator InterLock Technologies produces interlock kits for many different type main panels. Find your panel and order the matching kit to supply backup power for your entire house. Generator neutral should be floating, not bonded to chassis with this type installation. Again, looks like a simple system to defeat by removing the front panel cover.
The Electrician's Handbook from Nexans Canada Inc. (1828kb PDF)
NoOutage.Com offers several backup configuration ideas for installing a generator transfer panel. Mine would be similar to B2 with the cord running under the garage door, but with a larger panel such as in B7. Check their entire site for ideas. They also sell full size transfer panels.
Canadian Tire pamphlet (2MB .jpg files)
Six steps to back up generator power, Generators- Wattage chart
Generator FAQ by Survivalistbooks.com
How Stuff works describes how emergency power systems work.
Generac Using your Generator for Standby Power
Official Web Site for Briggs & Stratton Home Generator Systems
US Carburetion Kit Center sells propane conversion kits for small gasoline engines. I've opted to leave my engine fueled by gasoline only.
This item compares relative cost for operating a small generator on gasoline, natural gas, and propane.
Mayberry Sales and Service has a good page for generator selection and other useful generator information. Check in particular the sections on transfer panels. It explains the how and why of using one.
Dakota Electric safety first and Guide to Installing a Standby Backup Generator (pdf).
Gulf Coast News site an article titled "Backup power for your Home". There are tips for generator selection, power management, and safety.

 warrenstone@eastlink.REMOVE.ca
Please email any comments or suggestions.
Hopefully this page will be of assistance. Feel free to link here and forward the site to friends or others who may be interested. Other than as noted all content is original. Please give proper credit if you borrow from here.
If you've found my site useful and would like to donate via PayPal to help keep it online please click the banner below.
Thanks
 Warren
"There are only 10 types of people in the world;
Those who understand binary, and those who don't."
I have tried to summarize information I have picked up online, through books, and so on to assemble this page. It is simply impossible to recognize every piece of information that I have come across. I have done my best to reference things and give credit as appropriate. If you find something that should be acknowledged please let me know. This page is for sharing knowledge and helping others. It is not my intention to steal credit from anyone. I am not a certified electrician. My field of study is electronic communications systems, and I work in broadcasting. My job involves installation, maintenance, and repair of radio and television broadcast transmitters and related equipment, particularly passive RF items such as antennas, feedlines, and combining systems. Working with electric generators allows me to combine a personal interest in small engines with electrical and electronics systems in one package. Please confirm for yourself anything stated on my web pages before you proceed. I appreciate any feeeback and suggestions for improving this or any of my web pages.